Posted on

Top Considerations When Buying a Microscopy Camera, PART 3: Resolution & Pixel Size

By now you understand if you need a color or monochrome camera, and you’ve determined how you will attach the camera to your microscope. But what about the “megapixels”?  More is better, right?  If you are using a microscope as your camera lens, our recommendation is not to follow the general consumer hype that more megapixels are better.  Although this may be true for your cell phone, the logic doesn’t transfer to your microscope.  Let’s look at resolution more closely from the perspective of microscopy imaging. Warning: This may get a little geeky.

Unfortunately, choosing the optimal camera resolution isn’t as easy as picking color or monochrome.  This will involve a little bit of math and in the end, you will have a general idea of when more resolution is better and when it’s not.

Optimal camera resolution (pixel size and # of pixels) depends on the resolution of the microscope and the magnification that is used for imaging.  In a microscope two objects are said to be “resolved” when they can be clearly distinguished from each other.  This is referred to as the Rayleigh Criterion – it defines the optical resolution of the microscope and is illustrated below.  When viewing objects in a microscope that are below the limit of resolution (we refer to them as point sources of light), each creates a pattern called an Airy disk, appearing somewhat like concentric ripples in water with a much taller peak in the middle.  Figure 6 below illustrates a sideview of the Airy disk pattern of two objects that are fully resolved, just resolved, and not resolved, respectively.

Figure 6. Airy disks are diffraction patterns around objects. The peak seen in these patterns indicates the central location of an object (point source). (b) illustrates the appearance of the Airy disk patterns when two objects are just barely resolved, called the Rayleigh Limit.
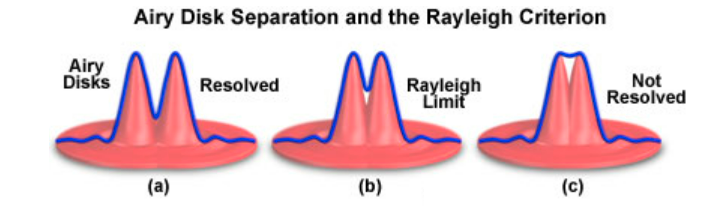
Source: https://micro.magnet.fsu.edu/primer/digitalimaging/deconvolution/deconresolution.html

Mathematically, the Rayleigh Criterion (d) is described as:

d = 0.61λ/NA

where λ is the wavelength of light and NA is the Numerical Aperture of the objective (this assumes that your microscope has been correctly adjusted for Köhler illumination, so the condenser has the same NA as the objective). Why does the wavelength of light matter? Simply stated, resolution improves with shorter wavelengths — better resolution with blue light than red.

In microscopy, Rayleigh’s criterion is typically expressed in nm (nanometers) or µm (microns, micrometers).  So how does this fit with the number of pixels in a camera?  The Nyquist-Shannon theorem requires a sampling interval (in our case the pixels of the camera) that is at least twice the optical resolution.  You can also think of the Airy disk of each object being covered by at least 2 pixels.  Consider that each of the two objects mentioned above are so small that they are only detected by one pixel each – their size is at or below the optical resolution of the microscope.  If the objects are detected by adjacent pixels, we couldn’t tell if it were two objects or one slightly larger object.  But if there is an empty pixel between them thereby satisfying the Nyquist-Shannon criterion, then we can say that the two objects are resolved on the camera.

Below is a figure adapted from the Cell Sciences Imaging Facility at Stanford University.  It illustrates two objects (point sources) that are separated by the resolution of the microscope according to Rayleigh’s Criterion.  The Airy disks for each cover approximately 3 pixels wide on the camera sensor.  Therefore you can see that the bright peaks of each Airy disk can be clearly identified by single pixels that are well separated by two other pixels.  If we move the objects closer together, you can see that we would not be able to definitely say that our camera can detect two separate objects or just one that may span two pixels.

Figure 7. Airy disks generated by two objects (point sources of light) as detected by pixels of a digital camera sensor. At theoretical maximum optical resolution, the Airy disk for each object must cover >2 pixels. Where the Airy disks overlap more, the centers occupy adjacent pixels and, thus, the objects cannot be separated.
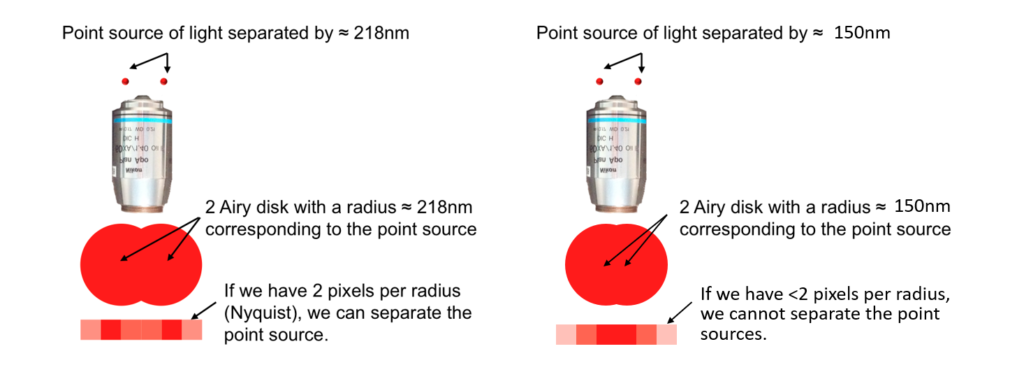
Source: https://microscopy.stanford.edu/fundamental-concepts

Magnification adds an additional more variable to the calculation for camera resolution.  Higher magnifications project larger images onto the camera sensor, so the pixels can be larger and still satisfy the Nyquist-Shannon criterion.  Larger pixels collect more light and, therefore, are more sensitive.

So here is the quick takeaway message about camera resolution.  If you are using lower magnifications (e.g., stereo microscopes at lower zoom levels), then you will want smaller pixels and more of them.  If you are imaging at higher magnifications (e.g., 40X objective and higher), then you will want larger pixels.

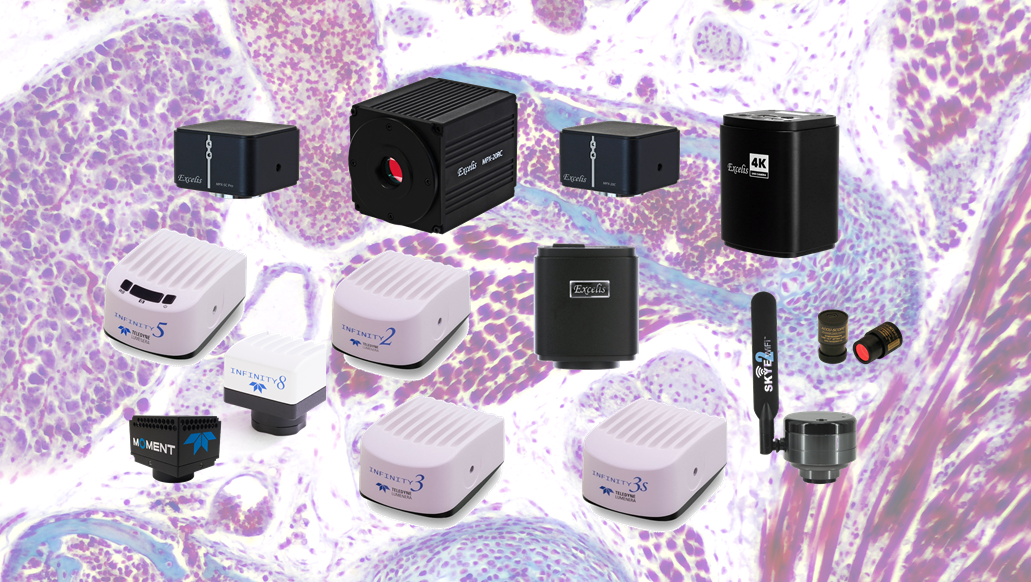
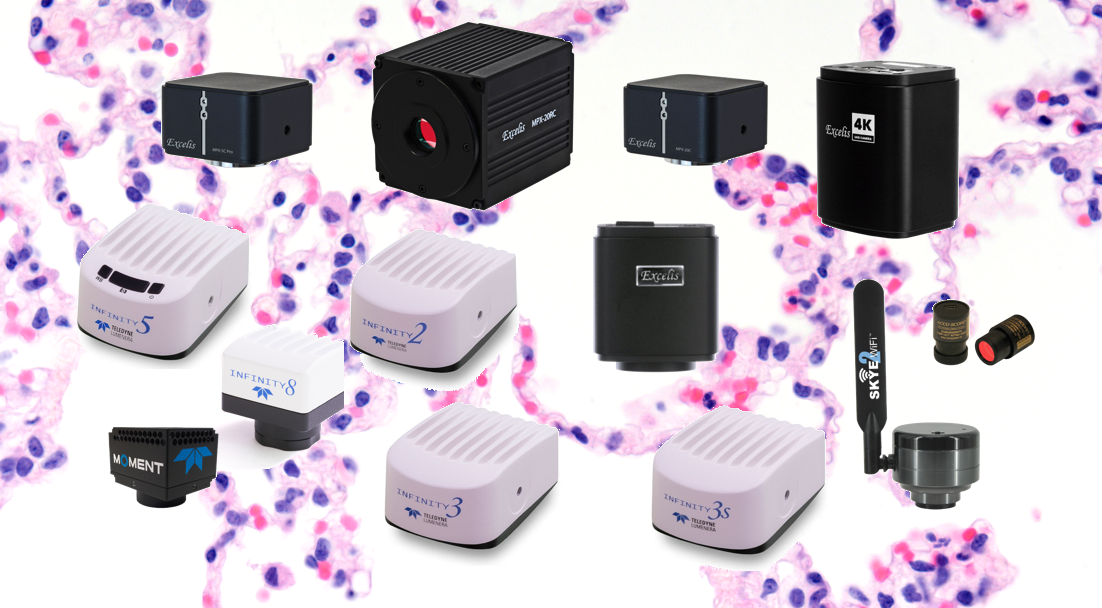
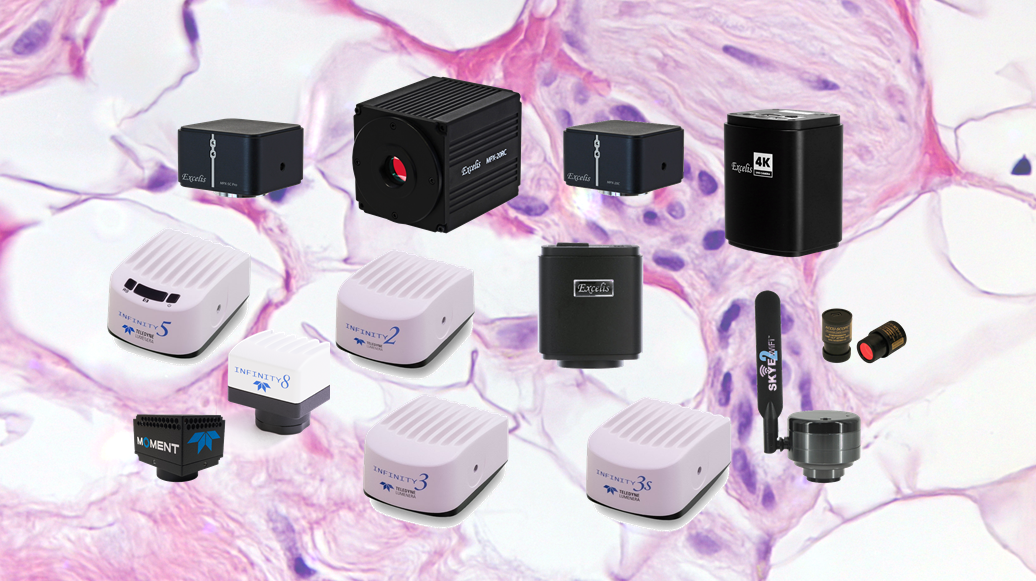
Below are our recommendations for cameras depending on your microscope and magnification. Although they may not exactly fit the criteria discussed above, they are reasonably close and will perform adequately.

Stereo Microscopes:

Upright and Inverted Microscopes (40X objective or higher):

  • BEST:
    • Teledyne Lumenera INFINITY3 series cameras (4.54µm – 6.45µm pixels, depending on model; color or monochrome)
    • Teledyne Photometrics Moment camera (4.5µm, monochrome only)
  • BETTER:
  • GOOD:
    • ACCU-SCOPE Excelis HD.  8MP color camera with built-in software for stand-alone operation or USB connection to PC.

Upright and Inverted Microscopes (lower than 40X objective):

For a deeper dive into resolution with some examples using different objectives, please read this blog on the Teledyne Lumenera website.  More information on microscope resolution, Nyquist and Shannon sampling theorems and camera selection can be readily found on the internet.

In the next part of this series, we will discuss the different types of camera sensors and how they may impact your imaging.

Posted on

Top Considerations When Buying a Microscopy Camera, PART 2: Connecting a Camera to Your Microscope

This may seem too obvious, but a major consideration when adding a camera to your microscope is how to make that connection between the camera and its lens — your microscope.  If your microscope has a camera port or a trinocular viewing head, then it is easy to find an adapter that will couple a camera to the microscope.  The most common adapters (a.k.a. couplers) for microscopy cameras is the c-mount adapter.  It features an industry-standard 1” diameter thread with 32 threads per inch.  The flange of the c-mount is 17.526mm from the camera sensor plane.  The c-mount can accommodate cameras with sensors up to 18mm diagonal, beyond which cameras will use other types of mounts such as T or F.

Figure 3.  Examples of a C-mount camera adapter, the C-mount of a microscopy camera, and the two installed on the trinocular camera port of a microscope.

If your microscope does not have a camera port or trinocular head, you may be able to add a camera port as an accessory on some styles of microscopes.  For some upright (compound) microscopes, ACCU-SCOPE offers an intermediate accessory that is installed between the microscope frame and the viewing head.  The camera port on the accessory accepts standard c-mount adapters – you can contact ACCU-SCOPE for our recommendation of the best adapters to use.

Figure 4.  The camera port accessory is installed between the microscope frame and ergonomic binocular viewing head.  A pull lever is used to shift light to the camera instead of the eyepieces.

One important note about camera adapters.  They are available in a variety of magnifications, which are intended to match the image size coming from the microscope to the size of the camera sensor.  Too low a magnification and you will see shading in the corners called vignetting.  Too high a magnification and you only see a small portion of the field of view see through the eyepieces.  To determine an appropriate adapter magnification for your camera, match the adapter magnification with the diagonal measurement (in inches) of the camera sensor.  For example, a 2/3” camera sensor (2 ÷ 3 = 0.667) would use a 0.667X camera adapter.  This is just an estimate, so consult with your microscope sales representative for options.  Sometimes a lower magnification adapter will give excellent results while still avoiding vignetting.  For more information on selecting a camera coupler, you can refer to this application note from our friends at Teledyne Lumenera.

In the absence of any specific camera port, you can use the eyetube as the camera port.  The ACCU-SCOPE ACCU-CAM eyepiece camera is designed to fit into the eyetube of your microscope without the need of an adapter – just remove the eyepiece first.  The ACCU-CAM has a USB connection to a Windows PC for controlling the camera and snapping images.  Eyepiece cameras can turn any microscope into a digital microscope, even monocular microscopes!

Figure 5.  The ACCU-CAM eyepiece camera from ACCU-SCOPE. Photo on left shows the end that installs in the eyetube in place of an eyepiece. On the right, the USB port is visible.

In the next installment of this series, we’ll explore the relationship of microscope resolution, camera resolution and pixel size and how these may impact your quest for a microscopy camera.

Posted on

Top Considerations When Buying a Microscopy Camera, PART 1: Color or Monochrome

Microscopes are found in laboratories and science classrooms around the globe.  With the advent of digital cameras, it is now even easier to upgrade a microscope to view the live image on a screen or monitor, capture images for documentation and analysis, and even stream live images with remote colleagues.

But not all cameras are alike, so how do you know which camera is best for you?  Over the course of this multi-part series, we’ll try to explain the key specifications of cameras and why they matter.  By the end, you should have a good idea of the best camera for your microscope type and application.

PART 1:  Color or Monochrome

Let’s start with an easy question: Do you need a color or monochrome camera?  If you are snapping photos of specimens with many different colors and you need to capture your specimens in all their colorful glory, then a color camera would be best.

But say your specimen is fluorescent, and it doesn’t appear very bright when viewed through the eyepieces.  Even if you may want to view your specimen with different fluorescent channels (different excitation wavelengths and different emission wavelengths, therefore different colors), then a monochrome camera may be your best option.  Let’s explore why. To create a color image, most color cameras use color filters in a distinctive pattern overlayered onto the pixels of the camera sensor.  The Bayer mosaic mask is the most common color filter pattern (see Figure 1).  The tiny filters are arranged in a 2×2 pattern with position 1 being blue, positions 2 and 3 are green, and position 4 is red.  Firmware on the camera itself “fills in the gaps” so that every pixel is interpreted by a computer or monitor as having all three color components – red, blue and green.

Figure 1. Bayer filter pattern (left). Cross-section of sensor and resulting pattern (right). 
Source: https://en.wikipedia.org/wiki/Bayer_filter

By definition, a filter only allows some things to pass through it.  In the case of a color camera, the pixels only “see” a little bit of the light that emanates from the sample.  Monochrome cameras do not have these filters.  For this reason, monochrome cameras are more sensitive than their color counterparts by allowing more light to reach the pixels on the sensor.

Just because monochrome cameras are “color blind” doesn’t mean that you can’t view the image in color.  To make it more appealing to the human eye, most camera software allows the user to apply a color to the monochromatic image, often referred to as pseudocoloring.  Most people will pseudocolor a monochrome image using a color similar to what they would see through the eyepieces (e.g., DAPI has peak emission at 461nm, so a blue of ~461nm is generally used).  In Figure 2, the nuclei were stained with DAPI.  The mitochondria were labeled with a red-emitting fluorophore, and the cytoskeleton was labeled with a green-fluorescing fluorophore.  Each of those channels was pseudocolored according to the emission color of the fluorophore.  Monochrome images, however, allow the user to choose any color to differentiate one stained structure in the sample from another.

Figure 2. Images of fluorescence specimen acquired with monochrome camera. Far left: green excitation, red emission. Second from left: Blue excitation, green emission. Third from left: UV excitation, blue emission. Far right: Composite of each channel after assigning the emission color to the channel.

ACCU-SCOPE is proud to carry microscopy cameras from Teledyne Lumenera.  Lumenera Infinity cameras are available in both color and monochrome versions.  View the selection of Infinity cameras HERE.  ACCU-SCOPE also offers color cameras for a wide variety of applications.  View them HERE.

In the next part of our series, we’ll explore how your microscope configuration may impact your camera selection.

Posted on

ACCU-SCOPE Introduces New ACCU-fluor LED Fluorescence Illuminator for Microscopy

[March 2022]  ACCU-SCOPE Ltd. is pleased to introduce our new ACCU-fluor LED fluorescence illuminators for upright compound microscopes. These illuminators install easily between the viewing head and microscope frame of compatible microscopes and offer a great alternative to traditional fluorescence accessories.

Features and benefits include:

  • Built-in LEDs and filter sets.  No need to install filter cubes or align lamps.
  • Choice of 1-, 2- and 3-channel models.
  • Independent LED intensity control by channel with memory function.
  • Front LED display (on multi-channel models) shows active channel and LED intensity.
  • No impact on precious bench space, and only adds 3-inches to the height of the microscope,
  • Fits most popular upright microscopes.  Dovetail adapters are available for brands and models of ACCU-SCOPE, Olympus BX, Nikon Eclipse E and Ci models, Leica and Zeiss.
  • Economical.  Costs thousands of dollars less that traditional illuminators requiring filter cubes and external solid state light sources.
  • Safe.  No mercury.

Fluorescence microscopy is an essential tool for studying cellular structures, protein localization and identifying viral, bacterial and parasitic infections. The new fluorescence illuminators provide a simple and safe way to either upgrade an existing microscope to fluorescence, or replace an older and less efficient fluorescence system.

Click HERE to learn more about ACCU-fluor.

Posted on

Exploring Upright Microscopes: Everything You Need to Know

It is believed that compound microscopes (also known as upright microscopes) have been around since 1590, when Dutch spectacle-maker Zacharias Janssen invented this incredible piece of technology. Since then, scientists and students alike have used upright microscopes to examine specimens that are too small to be visible with the naked eye. What sets them apart from other microscopes is their use of multiple lenses for magnification, flatness correction and color correction. Typical upright microscopes have objective lenses and an eyepiece lens to obtain magnifications between 40x and 1000x. These microscopes are often the go-to choice thanks to their incredible power and simplicity in operation.

To determine if an upright microscope is right for you, let’s look at how it works and in which applications it is best used.

Parts of an Upright Microscope

The components of your particular upright microscope may vary based on the configuration of the instrument, but most uprights have the following features:

  • Eyepiece (ocular): This is the lens through which the observer will look. It typically provides 10x or 15x power.
  • Viewing head: This is the connector piece between the eyepiece and the objective lenses.
  • Arm: This piece connects the head to the base of the microscope.
  • Base: This is the bottom of the microscope.
  • Revolving nosepiece: This part of the microscope holds the objective lenses. Rotate the nosepiece to change to another objective..
  • Objective lens: Typically, an upright microscope will have three or four objective lenses. The shortest lens has the lowest power, while the longest objective usually has the highest power.
  • Stage: This is the platform where the observer places their slides. The stage usually has clips to hold the slides in place. If the stage is mechanical, two knobs on the side will allow the stage to move left and right.
  • Condenser: This component is located under the stage (between the sample and illuminator) and concentrates the light delivery to the specimen.
  • Rack stop: This component determines how close the objective lens can get to the slide. It is typically set in the factory to prevent the lens from coming down on the slide and breaking it.
  • Focus knobs: This component moves the specimen to be in focus through the eyepieces by moving the stage up or down. A coarse focus knob moves the stage faster, while a fine focus knob allows for precise focus of the sample.
  • Illuminator: This is the steady light source shining up through the stage.

How an Upright Microscope Works

Unlike a stereo microscope where the light source usually shines from above onto the specimen, an upright microscope’s light source is transmitted from below the stage and upwards through the sample. The observer then looks down upon the specimen through an ocular lens. The focus knobs adjust the object up or down to be in focus to the eyes. The power of the eyepiece and objective lenses are multiplied together thereby creating greater magnification than a single lens alone. Because the working distance between the objective and the sample is so small, upright microscopes are ideal for thin or flat subjects like bacteria on a slide rather than something that is thicker (e.g., a housefly) or that needs to be dissected.

When to Use an Upright Microscope

Upright microscopes are used to observe small samples or details that are generally too small to be seen with the naked eye. They are ideal for life science and cell biology applications because they can utilize basic observation methods including brightfield, phase contrast, darkfield, and fluorescence microscopy of samples (see examples below).

To reveal greater detail, an upright microscope is often used to view thin slices of larger tissue samples from animals. Brightfield observation uses the inherent color in a sample or samples that are stained to add color to and enhance certain features. Phase contrast uses an optical technique to enhance contrast to usually unstained samples, and some existing color may be lost in this process. In darkfield microscopy, light that strikes a sample is scattered and some is captured by the objective for observation, whereas unscattered light never gets captured, resulting in a dark background. Fluorescence microscopy uses fluorescent molecules to tag particular structures in a sample, making them visible to the eye. Differing from the other observation methods above, the light source for fluorescence microscopy shines from above the sample. Because of their ease of use and powerful magnification, upright microscopes can be readily found in various clinical, educational, pharmaceutical, research, and veterinary laboratories.

Trust ACCU-SCOPE to Meet Your Upright Microscopy Needs

Since its invention over 400 years ago, the upright microscope has been used to make amazing scientific discoveries, and is still the most recognized and popular choice of microscope for viewing specimens on a slide. If you’re shopping for quality microscopes for your lab, turn to ACCU-SCOPE for all your microscopy needs. We have an array of microscopes and accessories, including upright microscopes and microscope heads. If you need low magnification for basic observation and dissection, we also have information on stereo microscopes. Don’t hesitate to contact our team to determine which type of microscope is best for your application.

Posted on

An Exploration into Stereo Microscopes

Stereo microscopes have been in use for a little over a century, but it’s not uncommon for those who routinely use them not to know how they differ from other models. Why are stereo microscopes so special?

With two optical paths and eyepieces, stereo microscopes provide a three-dimensional view of the specimen. Like our eyes, the optical paths converge onto the sample, coming to the focus point from different angles, providing a sense of depth that makes stereo microscopes so beneficial for dissecting applications. They also have a long working distance which allows easy access to the sample with tools. For this reason, stereo microscopes are also referred to as dissecting microscopes.

Let’s take a more in-depth look at stereo microscopes, how they work, and in which applications they should be used.

Parts of a Stereo Microscope

Every component of the stereo microscope is important to its unique function. Its parts may vary depending on the configuration and use of the microscope, but an average classroom stereo microscope will have the following components:

  • Eyepieces: The microscope’s eyepieces are also called ocular lenses and are the part the viewer looks through to examine the specimen. The eyepieces are normally set at 10x magnification, but some models can reach up to 75x magnification.
  • Diopter setting: This microscope component helps prevent eye strain by making up for the differences between the image seen through the left and right eyes.
  • Objective lens: Each eyepiece of the stereo microscope is connected to its own objective lens. The microscope’s magnification level can be determined by a single fixed objective, a rotating multiple lens turret, or a zoom.
  • Stereo head: This component holds the two eyepieces. In one optical design (Greenough), the objective lenses and stereo head are housed together in a single body.  In the second major optical design (Common main objective or Galilean), the head mounts to the top of the optical zoom body.
  • Focus knob: Stereo microscopes are commonly equipped with at least one focus knob. This knob is used to move the stereo head up and down to sharpen the image of the sample.
  • Top lighting: Many microscopes only have one source of lighting, but the stereo microscope has a top and bottom light. The top light illuminates the object from above. Top lighting can be built into the microscope stand, or can be delivered by an external source either attached to the bottom of the microscope (like a ring light) or by fiber-optic bundles that direct light where the user needs it (refer to the feature image for this article).
  • Bottom lighting: The bottom light of the microscope shines light through the stage and improves the visibility of translucent objects.
  • Stage plate: The stage plate is the spot where the specimen is placed. It is directly underneath the objective lens. The plate is often reversible with one black side and one white side to contrast the specimen.
  • Stage clips: These clips are designed to hold any slides in place on the stage.


How Does a Stereo Microscope Work?

The stereo microscope is an optical light microscope that uses the light reflected off the specimen to create a clear image of the objects’ individual details. It magnifies things at low power and is commonly used with solid or thick samples.

As the light reflects off the object, the viewer’s left and right eyes see different angles of the same sample, creating a three-dimensional image that is more informative for viewing detail and surface structure than a microscope with a single objective.

Figure 1. Comparison of the two main optical designs of stereo microscopes. Note the separate optical paths for each eye of the observer, and how the optical paths converge onto the specimen at the bottom of the diagram. Also note the longer working distance of the Greenough design (distance from the bottom of the main objective to the specimen).

When Should a Stereo Microscope Be Used?

Because a stereo microscope allows the examination of three-dimensional specimens with its two separate optical paths and long working distance, it can be used in a variety of applications. For example, biologists and students can use these microscopes to perform dissections, while botanists use them to examine plants. They can also aid in repairing circuit boards and watches, cleaning and analyzing fossils, and dermatological examinations.

With additional microscope accessories, the stereo microscope can be configured to match a variety of applications. Boom stands, flex arms, track stands, and table mounts can improve the microscope’s ease of use, and microscope illuminators can enhance the specimen’s image and provide needed contrast.

Looking for Stereo Microscopes? Turn to ACCU-SCOPE

If you’re looking for high-quality stereo microscopes for your research, medical, or instructional purposes, trust ACCU-SCOPE to meet your needs. We have some of the best microscopes in the industry! If you need higher magnifications, we also offer compound microscopes. Contact us today to receive a quote.

Posted on

What to Consider When Investing in Microscopes for Education

Microscopes are wonderful educational tools because they offer students hands-on experiences that bring textbook concepts to life. Because these instruments are vital to a student’s comprehensive learning experience, it’s important to choose the right kind of microscope when outfitting a classroom. A microscope will need to magnify things well, but must also be robust enough to withstand years of use by hundreds of students. Below are four key factors to consider when buying an educational microscope.

Type of Microscope

When choosing a new microscope for the classroom or educational lab, it will be necessary to consider the type of microscope your students will need. What will they be reviewing in class?

If they are looking at larger samples, a stereo zoom microscope could be a good choice for your students. This microscope is often used for biology dissections and examining rocks, minerals, plants, bones, and more. With a stereo microscope, students can get a 3D image of the sample they are studying.

A compound microscope (a.k.a. upright microscope) can be used for samples that the naked eye cannot see because it offers a higher magnification. Samples are prepared and mounted onto microscope slides before being viewed under the lens. Students often look at prepared slides of blood cells, bacteria, tissue, and parasites to save time and complexity of making their own slides.

For live samples such as living cells or organisms, students use inverted microscopes. These microscopes allow them to observe the samples in Petri dishes and other culture vessels. Unlike a compound microscope, the objective lens is located beneath the stage – this offers greater flexibility to accommodate dishes of various sizes.

If you’re still unsure which microscope is suitable for your educational application, you can also look at the size, weight, durability, and ease of use of the microscope to narrow down your choices.

Size

The size of a student microscope is one of the essential features you’ll want to think about when buying a microscope. Most likely, students will be moving the microscopes from storage to their workspace and back every day. In this case, consider a model that is lightweight and compact enough to be transported and stored with ease.

Durability

Often, microscopes in educational environments are used by students having minimal experience with microscopes. For this reason you want to buy a microscope that can withstand bumps, movement, and bounces that are bound to occur. Look for safety features like fixed eyepieces, a locking pin for the observation head, and a focus lock that can help your students’ microscopes to last longer. Microscopes with metal bodies are generally more durable than lighter weight models with plastic features.

Optics

Ensure the microscopes you buy have high-quality optical components so students can visualize all the minor details of a sample. A microscope with a wide magnification range, such as zoom or multiple objectives, enables students to observe samples at multiple magnifications thereby providing context of the detailed structures to the larger specimen. Most newer microscopes offer LED illumination providing energy savings, long lamp life and crisp, even illumination.

Discover the Best Educational Microscope at ACCU-SCOPE

In any science class or student lab, microscopes are essential. With so many types of microscopes available, it can be challenging to narrow down the options while deciding which one to buy. Let the team at ACCU-SCOPE help you discover the best microscopes for your educational purposes. We offer a range of microscope types and accessories, including stereo microscopes, inverted microscopes, and microscope cameras. If you have any questions about our microscopes, reach out to us today!

Posted on

Introducing the New INFINITY8 Microscopy Cameras from Teledyne Lumenera

[July 2021] — ACCU-SCOPE Inc. is pleased to introduce the new INFINITY8 Series of microscopy cameras from Teledyne Lumenera spearheaded by the latest Sony® Pregius™ Gen3 CMOS sensors.  These introductions address the market demands for high-performing and budget-friendly solutions for fluorescence and general imaging applications.

INFINITY 8-2 2 Megapixel USB3 Microscope Camera

The INFINITY 8-2M is the new go-to microscopy camera for routine fluorescence imaging on a tight budget. With huge light-gathering pixels, large field of view, and low noise characteristics, this camera enables labs to have a dedicated monochrome camera for low-light imaging requirements.

INFINITY 8-8 8.3 Megapixel USB3 Microscope Camera

The new INFINITY 8-8 camera is designed to reproduce what your eye sees in the eyepiece, complete with the intuitive Infinity Analyze 7 software package all for a price that will fit even within the tightest budgets. Stream live videos or capture still images and share with ease. Available in color or monochrome, this is a great all-around camera for life science and industrial applications.

INFINITY 8-20 20 Megapixel Color USB3 Microscope Camera

The ultra-high-resolution INFINITY 8-20C microscopy camera features a large Field of View, and is optimized for fast sample focusing to capture every detail even with low magnification. The INFINITY8-20 is a great choice for biological and material industrial samples.

Click HERE to learn more about the Teledyne Lumenera INFINITY8 cameras”.

Posted on

Exploring the Role of Microscopy in Virology and Disease Research

The term microscope originates from the Greek words mikros meaning “small,” and skopein, meaning “to look.” The first recorded use of a microscope-like instrument dates back to the late 16th century. Yet, it wasn’t until the mid-17th century that significant advancement in magnification enabled Van Leeuwenhoek to observe what he called “animalcules” in samples. These “animalcules” were later renamed bacteria and found to be the cause of several diseases such as tuberculosis and the plague. Still, years would pass before viral agents could be successfully observed with microscopy due to past limitations in magnification.

During the latter part of the 19th century, Adolf Mayer speculated that an unknown and unseen infectious agent was causing mosaic disease in tobacco plants. Although he never physically viewed the virus, further experiments involving the filtration of plant particulate matter showed the presence of an undetermined pathogen. It would take decades for the tobacco mosaic virus to be identified in crystallized specimens leading to the additional discovery of over 900 viral variants that infect plant species.

Early Discoveries in Microscopy

In the mid-20th century, the development of the electron microscope enabled researchers to finally observe viruses. By utilizing accelerated electrons, scientists were able to see particles significantly smaller than any elements viewed through the optical microscopes of the time. Although the visual discovery of viral particles was a profound advancement in observational methods, the inability to see viruses work in real-time using an optical microscope would remain elusive until the end of the century.

During the 1980s, light-based observation of viruses was finally possible using highly sensitive microscopes. For the first time, researchers could see viral particles interact with one another and inside cellular membranes. The mechanics of an infection caused by a virus could now be viewed in real-time, enabling scientists to better understand mechanisms of viral infection and illness. The virus could no longer elude detection or the new treatments that would be discovered as a result.

Modern-Day Microscopy

Significant leaps in technological advancements continue in the field of microscopy today. With advances such as phase-contrast microscopy, which can be used to study the impact of viruses on living cells, to TIRF microscopy, which can increase the effectiveness of detection utilizing specialized dyes, the field of microscopy is continuing to open the doors of scientific discovery.

ACCU-SCOPE is a leading provider of microscopes and accessories to provide researchers with robust detection capabilities. The pursuit of knowledge through the scientific process combined with technological advancement paves the way for a brighter future. Through microscopy, we will all benefit from a better understanding of viruses and their impact on us and the environment. To learn more about our microscopes for clinical and research laboratories, please feel free to contact us today.

Posted on

Emerging Trends in Biological Microscopy

As technological forces merge automation and computation with current advancements in optics, the full potential of biological microscopy is coming into focus. Since the advent of phase contrast microscopy by Frits Zernike in 1934, the pursuit of greater illumination techniques has been a driving force behind the many revolutionary advances that have taken place in the field.

The challenge of illumination is ever-present in microscopy. For decades, scientists struggled to find optimal forms of contrast manipulation to better visualize complex details in samples, and to probe deeper into the understanding of life’s complexities. If it were not for the constant pursuit of new techniques and new technologies, the entire scientific and medical communities would still be struggling to find their way in the dark.

2D vs. 3D Imaging

Traditional microscopy typically involves looking at a slice of tissue, cells, or microorganisms sandwiched between two pieces of glass (microscope slide and cover glass). The specimen is so extremely thin — often just a few microns thick — that it seems practically 2-dimensional by our observation. We focus on the specimen, and moving it in X-Y across the stage is generally sufficient to complete our observation.  Information obtained from 2D microscopy in this manner is absolutely beneficial, is the most widely used observation method, and continues to advance scientific knowledge. Yet, cells, tissues, and cellular organisms are 3D entities, and 2D imaging has limitations when exploring the complex mechanisms behind life’s functions. 3D imaging allows scientists and experts to closely examine these processes within a cellular context.

Fluorescence microscopy has truly advanced the application of 3D microscopy for the study of biological processes.  Where 2D microscopy only considers “planar” specimens, fluorescence microscopy adds a third dimension in the form of focus. High-resolution optics and noise-limiting technologies allow the microscope to acquire very thin optical sections through even a single cell (it’s a much more difficult task with thick specimens, but a topic for another time). Stack these images together (referred to as a Z-stack) and a 3D reconstruction of the specimen can be achieved. With the ever-increasing availability of observable data, long-standing mysteries about cellular functions will continue to be solved.

The Transition to Simplified Mechanisms for Non-Expert Users

Recently, there has been a shift in the development of scientific tools so that they can be better utilized by non-expert users. Most microscopes can now be effectively used by individuals with little experience in microscopy. This is due in part to the fact that many scientists and medical professionals are often trained in specialized disciplines. As a result of the depth of specialized training, they generally receive minimal training in microscopy, don’t fully understand how microscopes work (e.g. optics and physics), and don’t know how to optimize the microscope for the best results.

With the advancement of technology, microscopes and many imaging systems (e.g. cameras and software) are now being designed for ease-of-use. The operation of a basic microscope hasn’t changed in over 100 years, but software with a logical interface and retrievable imaging parameters dramatically steepens the learning curve. Microscopes are designed for greater ergonomics, haptics, and visual references (e.g. match the setting on the condenser diaphragm to the Numerical Aperture written on the objective) to simplify operation. It is a careful balancing act between improving technology while retaining accessibility.

Continuing to Shed Light on the Smallest Discoveries

As innovation and discovery continue to advance the field of microscopy, ACCU-SCOPE is here to provide you with the tools to build a solid foundation for your work. We are consistently evaluating our product offerings and adjusting our inventory to feature the latest in microscopy technology. Contact ACCU-SCOPE for more information about cell culture microscopes, clinical microscopes, cameras and digital imaging solutions, and other products that are essential for biological studies.