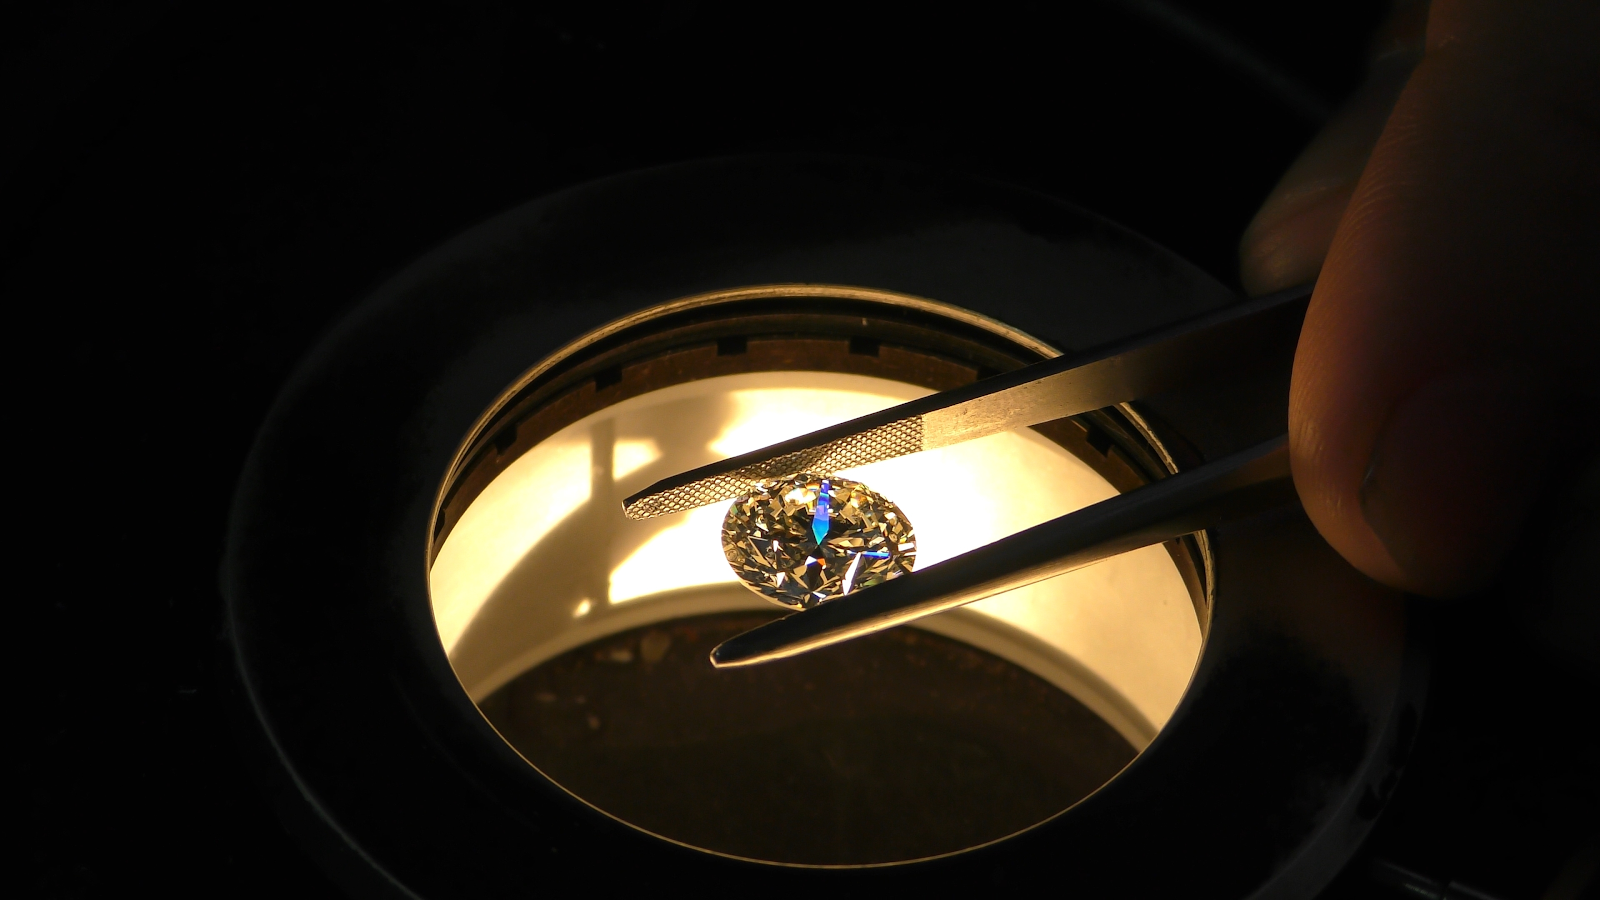
ACCU-SCOPE, a leading microscope supplier for more than 90 years, offers a variety of microscopes for gemology. A quality microscope can be a significant investment, but is essential for determining a stone’s characteristics, conducting appraisals, and photographing gems. Jewelers and gemologists can find gemological microscopes from ACCU-SCOPE with the features they need at prices that work for their budget.
When searching for the right microscope, one of the primary considerations is the magnification power. While just ten times magnification is sufficient for many tasks, for determining a stone’s authenticity, and to identify inclusions or other potential defects, many gemologists prefer magnifications of 40X-45X power.
In terms of illumination, it is helpful to have different options to best see the details of a stone, while also being able to portray it in the best light possible. Darkfield illumination is commonly used in gemology, making it easier to view any light-scattering inclusions. Brightfield illumination is also beneficial for examining dark or opaque inclusions, while minimizing the appearance of dust and scratches.
Various accessories are also available for gemological microscopes, including stone and ring holders, that allow for easier manipulation and viewing of gems and jewelry of various shapes and sizes.
ACCU-SCOPE has an assortment of both binocular and trinocular microscopes for gemologists. To get more information, receive a quote, or find an authorized distributor, visit https://www.accu-scope.com/.
About ACCU-SCOPE: ACCU-SCOPE is a leading supplier of high quality, certified microscopes for more than 90 years. Our optics have earned us a reputation for producing crisp, high contrast images with outstanding resolution. ACCU-SCOPE’s microscopes and accessories are available exclusively through a nationwide network of authorized distributors. To learn more, visit ACCU-SCOPE online at https://www.accu-scope.com/ today.
Gemologists rely on high-quality microscopes to do their work. Perhaps the most common usage of microscopes in gemology is to conduct an appraisal of a stone. The microscope needs not only to have enough power to be able to see flaws and inclusions in a stone, but also features that accommodate viewing gemstones of all shapes and sizes with ease.
ACCU-SCOPE has an assortment of high-quality binocular and trinocular microscopes for gemologists and jewelry makers that provide the clarity and accuracy demanded of the profession, all at an affordable price point. Here are some features gemologists should consider when shopping for a microscope:
Magnification Power
To see basic details on a stone, 10x power is generally sufficient. However for higher accuracy, many gemologists find that magnification of 40-45x is preferred for viewing the structures inside of a gemstone, including striae, fractures, inclusions, and other elements used to grade gemstones that cannot be seen with the unaided eye or even a loop.
Illumination
In gemology, the most common method for illuminating a gemstone is darkfield illumination, and most gemological microscopes will be equipped with a darkfield base. Patented by Robert Shipley Jr. in 1939, darkfield illumination showcases the gem against a black background. Inclusions and other flaws scatter the light, making them stand out as bright objects against the dark background. Dust and scratches may also scatter light causing them to stand out as well. Some microscopes also allow the operator to use brightfield illumination, which is useful for examining specimens with different zones of color or to mask dust particles and scratches. Those that photograph gemstones will want both options so that they can represent their subject in the best way possible.
Accessories
Gemstones require special accessories so that they can be easily held and manipulated, observed, and photographed. Depending on your exact needs, you may also want accessories that can hold stones of various sizes as well as jewelry, such as rings. Having a stand that tilts and rotates also makes it easier to view. If you choose a microscope without a base to suit various purposes, you can also purchase a gemological stand.
Find the Right Microscope for You
ACCU-SCOPE has various gemological microscopes along with specialized microscopes for numerous other applications so that you can find the right tool for your needs and budget. Contact us to learn more about our microscopes, get a quote, or find an authorized retailer.
With the global COVID-19 pandemic, most expositions have been either cancelled or postponed. Come “visit” ACCU-SCOPE during this virtual event. Follow the link to register for FREE. Request a meeting if you would like to discuss a product purchase or distribution opportunity.
The short answer to the title question is because white balancing produces better images, improves consistency, discriminates detail, balances contrast, and refines resolution. If you are using a microscope with a color digital camera, you should definitely take advantage of the white balance feature. But what is white balance, and when and how should you use it?
What is White Balance?
Quite simply, white balancing is the way we tell a color camera what is white or, at least, neutral (gray). Camera sensors “see” color according to the color filters that cover the camera sensor – each pixel only “sees” one color: red, green or blue. Depending on the specimen, the pixels will have different intensities and it’s this mixture that recreates the specimen in an image. When you place a neutral gray or white object on the stage and white balance a camera, the camera makes all the pixels the same intensity – equal amounts of red, green and blue. Now the camera knows what is white or gray, and the colors in the specimen are rendered
Why Does White Balance Change?
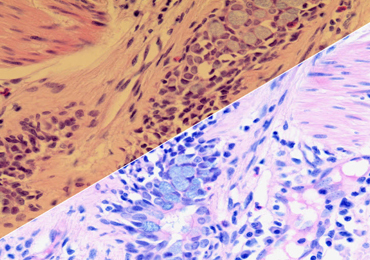
The color characteristics of your microscope’s light source varies every time you turn it on. LED light sources don’t vary as much as halogen lights, but nothing is perfectly stable. If you have a halogen light, you’ll notice that when the voltage is turned down, the light looks yellowish; turn the voltage up and the light appears white (see Figure 1; used with permission from https://microscopes.unitronusa.com/news/what-is-it-about-white-balancing/). You will also notice that the color of your sample appears distorted in different color illumination. White balancing can correct for these variations in light color and normalize your imaging across imaging sessions. After white balancing the camera, it is important not to adjust the light intensity, especially with a halogen light source – doing so will change the color characteristic of the illumination. For this reason, it is recommended to 1) adjust image brightness using the exposure control in the camera software, or 2) use neutral density filters to attenuate the light intensity, rather than turning down the voltage (LED light sources may be the exception).
Figure 1. Impact of Halogen Lamp Voltage on Illumination Color in Microscopy.
When Should I Use White Balance?
You should use white balance at the beginning of every imaging session, after your light source has warmed up, and after you set the light intensity. If you will be imaging with different magnification objectives, adjust the light intensity for the highest magnification objective then white balance the camera. As mentioned above, reduce camera exposure time or use neutral density filters to reduce the light intensity for lower magnification objectives – neutral density filters don’t change the color of the illumination. Alternatively, you can white balance before every image you take. Whether the images will be used for qualitative or quantitative analysis, white balancing before every image ensures consistency and comparability between them.
How Do I White Balance My Camera?
First, place a specimen on the stage and focus using the highest magnification objective that you plan to use for imaging. Perform Köhler illumination including condenser iris diaphragm adjustment for the objective being used.
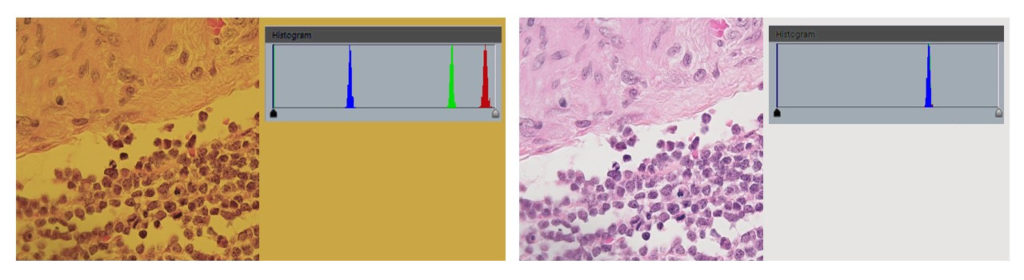
Next, locate the white balance function on your camera or in your camera software. Most cameras have a function for white balancing, and some may even have a button on the camera housing. Camera software may have a software button to press for white balancing, or software may have the option for locking white balance that you turn off to white balance, then turn back on to keep that setting. The white balancing process is similar across camera manufacturers. If your camera has a histogram function, you may find it informative and useful, plus you can see the impact of white balancing on the camera’s color channels (red, green and blue) as well as in the image (see Figure 2). Adjust the light intensity to about 70%-80% of maximum on the histogram, or approximate a medium brightness if you don’t have a histogram. Then without changing the light intensity, move the specimen out of the field of view. Click the white balance function on your camera or in its software. The background should now be a neutral gray, and the channels on the histogram should overlap. White balancing the camera does not affect what you see through the eyepieces.
Figure 2. Appearance of imaging field, histogram and specimen before (left panel) and after (right panel) white balancing.
One final recommendation. Automatic white balancing may seem very attractive — your sample will always have the right color. False. The camera adjusts white balance constantly as you move a specimen across the stage or with different samples. Therefore we recommend locking the white balance after you set it.
White balancing is a best practice in microscopy and, as with good experimental design, should be routine in your lab, too.
With the serious health issues surrounding COVID-19 (Coronavirus), the health and safety of our customers and employees always come first. ACCU-SCOPE has implemented a response plan based on recommendations from the World Health Organization (WHO), U.S. Centers of Disease Control (CDC) and local authorities. Here are some of the precautions we’re taking to protect the health and safety of our stakeholders.
Employees
Employees who are sick are mandated to stay home. Employees who report to work showing symptoms of illness will be sent home according to these health guidelines.
Employees showing symptoms or who may have had contact with others showing symptoms are encouraged to voluntarily self-quarantine.
Social distancing and best hygiene practices have been communicated and implemented by our staff including twice-daily sanitizing of our offices, laboratories and warehouse.
Company
ACCU-SCOPE does not intend to suspend operations. Our products are essential to healthcare and we will continue to operate as efficiently as possible unless otherwise directed by a government mandate.
All non-essential travel has been cancelled. We will leverage available technology (e.g. telephone, email, Skype, etc.) to maintain communications with our customers and our partners.
ACCU-SCOPE will, for the foreseeable future, process orders and ship product in a timely manner. We are well stocked with inventory and even more product will be arriving in the coming weeks.
We will provide an update should we need to adjust our plans and actions in response to the evolving COVID-19 pandemic. Rest assured that ACCU-SCOPE is committed to servicing our customers and partners to the best of our ability, while protecting the health and safety of everyone involved.
Thank you for your continued business. Be safe and be well!
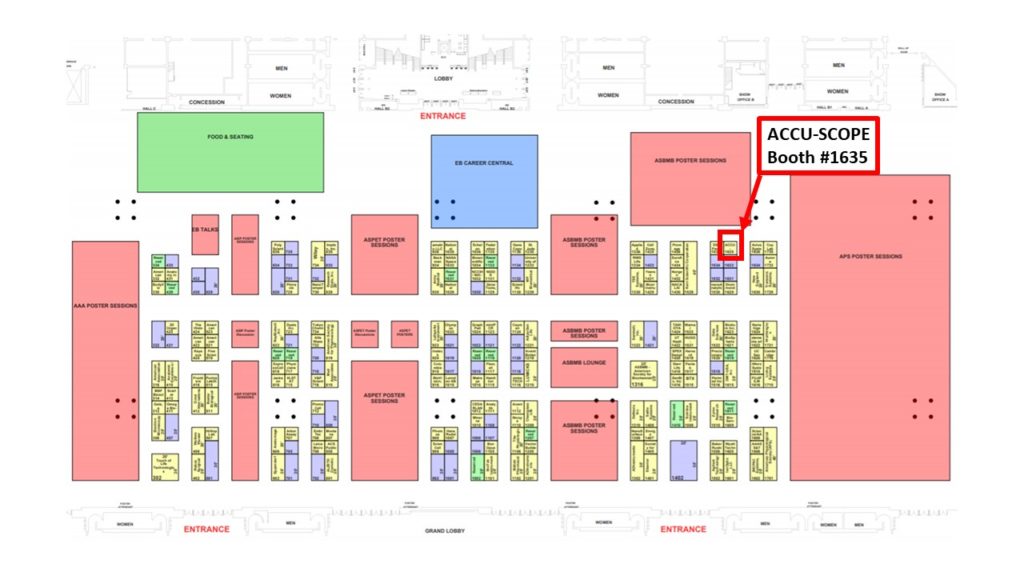
ACCU-SCOPE is delighted to exhibit again at Experimental Biology 2020 (“EB”). Our diverse line of microscopes and imaging devices provide excellent solutions for the researchers, scientists, educators and students who attend EB.
Here is a sneak peek at some of the products we will have on display at EB2020:
EXI-410: The EXI-410 inverted microscope is a true workhorse. Available with brightfield, phase contrast, emboss contrast and fluorescence, the EXI-410 is a perfect fit for all tissue culture labs.
ACCU-SlideMS: Do you need or want to scan your slides, but a slide scanner is too expensive? With ACCU-SlideMS, you can use your existing microscope to manually scan specimens the view and analyze them on a variety of 3rd party software.
Stop by Booth #1635 and test drive these products for yourself!
Believe it or not, people used film for taking pictures with microscopes – big, clunky cameras bolted to the microscopes, often with separate control units, and no way to preview the picture. Just push the shutter release, cross your fingers and hope for the best – of course you wouldn’t know until you actually developed the film. Fast forward a few decades and now cameras are ubiquitous – in our pockets, on our mobile phones and devices, even in our doorbells, all ready to capture the moment at a moment’s notice. However, microscopy cameras are, indeed, different than that ubiquitous smart phone camera. So why isn’t color imaging in microscopy as simple as a selfie?
Just as with cellphones, there are a wide variety of options for color cameras for microscopes. So how do you know which camera is best for you? Take a closer look at the technology.
Color technology
The most common technology to deliver a color image is a camera featuring a Bayer color mosaic filter (Fig. 1) – a red, green or blue filter on each pixel. Note that with this most common filter arrangement, a given pixel only “sees” one color — this means that the resolution of a full-color image (in megapixels) is only 25% of the total megapixels available on that camera. A Bayer filter is the same technology used in most professional and consumer cameras, and the cameras in our mobile phones. It is much more cost effective than 3-chip cameras (different sensor for red, green and blue) or cameras that use liquid filter-based color filters (take sequential images of red, green and blue, then overlay them). Of course, your application may dictate which technology is most appropriate (i.e. speed, resolution, flexibility, simplicity).
Figure 1. Common Bayer filter pattern on camera color sensor (left panel), and the resulting color pattern recorded by the sensor pixels (right panel. Images courtesy of https://en.wikipedia.org/wiki/Bayer_filter)
CCD or CMOS?
These acronyms refer to the technology used in the camera sensor. Traditionally, CCD sensors delivered better quality images (i.e. less noise), and CMOS were cheaper and faster. Newer CMOS technologies have greatly improved the image quality, and they’re still king when it comes to speed. Even more recently, sensor manufacturers are concentrating their focus on CMOS technology, and the availability of CCD sensors is declining.
The turtle and the hare
If you are only imaging fixed slides or dead/inanimate objects, then there’s no need for a lightning fast camera – the specimen isn’t going anywhere, literally. So, go for the best quality image possible, regardless of how fast or slow the camera. On the other hand, if you are imaging living systems (i.e. live microorganisms) or a specimen in motion, then a faster “shutter speed” translates into better snapshots in time. For live image streaming, displaying in front of an audience, or video capture, higher speeds are also preferred or necessary (i.e. 30 frames per second or faster is recommended), otherwise the audience could get motion sick.
Cameras with HDMI output generally provide faster frame rates for live preview, and often save the images to an internal storage device. USB-output cameras used to have slower frame rates than their HDMI siblings, but the newer USB 3.0 cameras can stream at well over 60fps. USB cameras save directly to a PC while offering greater control of camera settings for image acquisition through software. The latest arrivals are WiFi-connected cameras that take advantage of our mobile devices and a camera app for image acquisition. Thanks to the latest wireless technologies, their frame rates are usually somewhere between those of HDMI and USB-output cameras.
More is better, right?
As general consumers of imaging technologies (first point-and-shoot cameras, now smart phones), we’re tricked into thinking “more” megapixels translate into better images. NOT TRUE, at least not for microscopy! Given the same size of the sensor, more pixels (or the little light-sensing component of a camera sensor) means smaller pixels which, in turn, means less “volume” in the pixel to sense light, thus reducing sensitivity. Also due to the design of the technologies, there is a little more space between pixels in a CMOS sensor than a CCD sensor, therefore CMOS pixels tend to be smaller than those on a CCD.
And when it comes to sensitivity for lower light applications, [pixel] size does matter. As I alluded to above, smaller pixels are less sensitive than larger pixels. So for situations where sensitivity is important (i.e. fluorescence, darkfield, phase contrast), larger pixels (and consequently lower megapixel cameras) are actually preferred. There is also an ideal pixel size for each microscope magnification, and this is determined based on the resolution of the microscope (please refer to the article “What’s the Deal with Megapixels?” Suffice it to say that the higher the magnification, the larger the ideal pixel dimensions and, consequently, the fewer the pixels that fit on the sensor.
So, which camera is best? That’s for you to decide (and our technical applications people can help). Review the software and, of course, the image quality. Consider how you will use the images (still images or live viewing), and the camera’s connectivity (HDMI, USB or WiFi). One last word of advice: take the camera for a test drive.
[December 2019] — ACCU-SCOPE Inc. invites researchers and clinicians to explore the Infinity 5 Series from Teledyne Lumenera. With the new Sony® Pregius™ global shutter CMOS sensor, the Infinity 5 series cameras offer tremendous versatility with outstanding performance for a variety of applications.
Connect directly to an HDMI monitor, or connect to a PC or Mac via USB 3.0.
Soft-touch response buttons control the camera with or without connection to a computer.
Infinity5 cameras come with cables (USB and HDMI), power supply, and INFINITY CAPTURE software for routine imaging needs.
For expanded control, the Infinity 5 is interoperable with MetaMorph®, Micro-Manager, MATLAB®, LABView, and TWAIN and DirectShow interfaces.
Infinity5-3C (AU-320C-CMOS)
Infinity5-3M (AU-320M-CMOS)
Infinity5-5C (AU-510C-CMOS)
Infinity5-5M (AU-510M-CMOS)
Sensor
Sony IMX252
Sony IMX252
Sony IMX250
Sony IMX250
Megapixels
3.2
3.2
5.1
5.1
Color/monochrome
Color
Monochrome
Color
Monochrome
Optical Format
1 / 1.8″
1 / 1.8″
2/3″
2/3″
Max pixel resolution
2064 x 1544
2064 x 1544
2464 x 2056
2464 x 2056
Pixel Size
3.45μm x 3.45μm
3.45μm x 3.45μm
3.45μm x 3.45μm
3.45μm x 3.45μm
Top frame rate
~120fps at 8-bit
~120fps at 8-bit
~75fps at 8-bit
~75fps at 8-bit
Bit Depth
8-bit or 12-bit
8-bit or 12-bit
8-bit or 12-bit
8-bit or 12-bit
Data Transfer
HDMI or USB 3.0
HDMI or USB 3.0
HDMI or USB 3.0
HDMI or USB 3.0
“Click HERE to learn more about the Teledyne Lumenera INFINITY5 cameras.”
[November 2019] ACCU-SCOPE is pleased to introduce CaptaVision+ v2.1 for its line of Excelis cameras. With this latest update to CaptaVision+, all current models of Excelis cameras can be operated with the same version of software. Although only available now for Windows PC, a Mac-version will be released in the coming weeks.
CaptaVision+ v2.1 is compatible with Excelis HD and HDS cameras (AU-600-HD, AU-600-HDS), Excelis HD Lite and HDS lite cameras (AU-300-HD, AU-300-HDS), and Excelis MPX series cameras (AU-5C-CMOS, AU-6C-CMOS, AU-20C-CMOS). CaptaVision+ v2.1 is not compatible with the discontinued MPX-16C camera (AU-16C-CMOS). Importantly, CaptaVision+ v2.1 is only compatible with cameras having serial numbers beginning with “19xxxxx”.
New features found only in CaptaVision+ v2.1 include binning (supported only by MPX series cameras), presets for Biology or Industry modes, and area white balance (for Industry mode only). Other popular features include LIVE Extended Depth of Field, LIVE Image Stitching, and measurements on the live image.
CaptaVision v5.1 is still available and compatible with ALL Excelis camera models, including the MPX-6C. CaptaVision+ v2.0 is also still available, and is compatible with Excelis HD and HDS cameras and Excelis MPX series cameras – – v2.0 does not support the Excelis HD Lite and HDS Lite cameras.
“Visit our SOFTWARE page to download the latest version of CaptaVision+ and user manuals.”
[November 2019] ACCU-SCOPE Inc. is pleased to introduce the EXI-410 inverted microscope. The latest in ACCU-SCOPE’s growing portfolio of microscopy solutions for life science education and research, the EXI-410 is perfectly suited for a broad range of observation and imaging applications and is especially capable for use in tissue culture facilities.
The EXI-410 is available with a variety of contrast methods for observing living and fixed specimens including phase contrast, brightfield, fluorescence and emboss contrast. The optional mechanical stage and stage inserts offer convenience to the operator for viewing specimens in an assortment of tissue culture vessels and traditional slides. The fluorescence model is available with up to three built-in LED modules and filter cubes to accommodate the most common fluorophores (DAPI, GFP/FITC, RFP/TRITC, Texas Red and Cy5). With the optional camera adapter, Excelis HDS high-definition camera, HD monitor and monitor mount, operators can readily see their specimen on the large 11.6” display – – an ideal solution for working in a tissue culture hood or biological cabinet!
Click HERE to learn more about the EXI-410 inverted microscope.”